image-comparison grip-lines arrow-top-right zip arrow-right video minus arrow-back text shop twitter file home quick-order arrow-left youtube search arrow-down check all filter site_references image Slice 1 zoom 🎬 icons / _ icon size / _ download-queue Created with Sketch. chevron-down arrow-right picture pdf podcast exe plus hotline close xxx-1 burger clipboard linked-in ppt Artboard 🎬 icons / _ icon size / _ download-queue_add Created with Sketch. Layer 1 Created by potrace 1.15, written by Peter Selinger 2001-2017 My Account press_releases Created with Sketch. PRESS ds-instruments ds-preventive ds-implants ds-endodontics Cart presentation Created with Sketch. DS-Preventive-Icon-Grey video Created with Sketch. other Created with Sketch. text_piece Created with Sketch. promotion Created with Sketch. Spare Parts ds-imaging-systems case_study Created with Sketch. ds-treatment-centers broschure Created with Sketch. ds-prosthetics ds-restorative video Created with Sketch. flyer Created with Sketch. whitepaper Created with Sketch. article Created with Sketch. image Created with Sketch. Service ds-cad-cam Artboard Quick Order Dentist Chair study Created with Sketch. ds-orthodontics ds-implants ds-endodontics ds-cerec digital-scan grinder ds-diagnosis step_1 analyse ds-abutment-placement more-quality initiative scan more-quality ds-polishing digital ds-irrigation ds-treatment-centers Test treatment ds-restorative ds-implant-planning realistic construct book ds-planning-impression mirror anwender ds-preventive planning-2 ds-obturation ds-cad-cam 04 ds-implant-placement ds-retention-protection ds-anesthetics restauration form ds-inlab oven CORP-icon-grey-screen-tooth-cavity-pulpa robot plan place ds-orthodontics PDF-Formular_ganzneu PDF overlay ds-bone-regeneration ds-treatment-preparation vorher_nachher ds-maging-systems wifi omnicam PDF-Formular_neu_vonGünther treatment consulting planning comparison ds-set-up ds-prosthetics support step_3 ds-tooth-preparation ds-treatments ds-scaling step_2 ds-instruments software quote-english quote-french quote-text-german Created with Sketch. upload Created with Sketch. version Created with Sketch. globe
Start Explore Restorative Class II Solution

Class II Solution


A Comprehensive Guide

Class II Procedures and Your Dental Practice

Class II dental procedures are the heart of dentistry for a dental practice being the most common direct restorative procedure2 and being successful with them requires a perfected technique.  They have a large impact on overall practice health as direct resin restorations represent approximately 1/3 of annual dentist generated restorative revenue with an estimated 69% of annual patients receiving a direct restoration.1  

As it currently stands, Class II procedures typically generate less than $200 in revenue and take 30-40 minutes to complete3. That’s why dentists all over the world are using technological advancements that make the procedure faster, easier, and more profitable, without taking compromising shortcuts. Here at Dentsply Sirona, we pride ourselves on bringing predictability, efficiency and optimized performance to Class II restorations every day.

69%
of annual dental patients

will receive a direct restorative procedure.1 Nearly half of those are Class II procedures2

$200
in revenue

Class II procedures typically generate less than $200 in revenue3

30-40
min to complete

Class II procedures typically take 30-40 minutes to complete3

Class II Restorations

are more important to your practice than you might think. In fact, they account for almost half of all direct restorations.

The number one reason for composite failures is recurrent caries and the floor  of the proximal box is the most vulnerable area.2

That's why Dentsply Sirona Restorative has developed the first and only Complete Solution for the Class II procedure. From our industry-leading products to continuing education opportunities and expert clinical and product support, it's a holistic solution for optimizing every touch point in a Class II restoration.

2Durable Bonds at the Adhesive/Dentin Interface. Braz Dent Sci. 2012 ; 15(1): 4–18

The Class II Solution

is the only comprehensive Class II approach for more efficient clinical outcomes and bottom-line results.

When the Class II procedure accounts for almost half of direct restorations1, it’s time to rethink what it means to your practice. 

Dental Market IQ 2022 Research Report - Calendar Year 2021. For more information, contact Consumables-Data-Requests@dentsplysirona.com


Class II Procedure Video

Below, we’ll dive into the procedure step-by-step, including tips to help you optimize performance and increase profitability.

The Standard Class II Dental Restoration Procedure with products from Dentsply Sirona

Class 2 dental procedure tooth prepping with interproximal guard

Prepping the tooth correctly is critical to the success of the procedure, as Class II success can be compromised before you lay a hand on adhesive or composite materials.

When prepping, it is important to be careful to ensure you do not introduce iatrogenic damage. A prime example of this is nicking the adjacent tooth with the bur during prep, which occurs in 70% or more of Class II restorations5.

To avoid this and speed up prep, use an interproximal guard to protect the adjacent tooth (see image). This allows you to save time while also creating a more positive experience for your patients.

Isolation is the next step - and making sure the restorative field isn’t contaminated with blood or saliva will be key to success.

While patient hygiene is out of your control, there are a few things you can control to a degree, including how much you irritate the surrounding tissue during the procedure and how well you seal the restorative field off from moisture. While you may be tempted to use a wooden wedge, it’s better to use a sectional matrix system that includes a plastic wedge. Here’s why:

Image of bleeding after using a wooden wedge

A wooden wedge is forced into the interproximal space to create separation between the teeth which can often result in trauma and bleeding. This provides ineffective isolation and can prevent placement of adhesive-based restorations.

Use of palodent plus sectional matrix system with plastic wedge

The Palodent V3 sectional matrix system wedge design minimizes impingement of soft tissue to provide effective isolation.  

class II dental restoration matrix placement of Palodent Plus sectional matrix by Dentsply Sirona where the tooth has a natural convex contour

The next step is contact creation, which 70% of clinicians find to be the most challenging part of a Class II restoration6.

What does proper contact look like? In a correctly applied matrix, the tooth being treated tightly contacts the adjacent tooth at the middle third, and has a natural, convex contour, like the image.


Creating the best foundation for your Class II restoration depends on your matrix system. We recommend choosing a matrix system that:

  • minimizes impingement of soft tissue allowing adhesive to perform at its optimum potential,
  • creates a tight seal, and
  • provides an anatomically correct form

like the Palodent V3 sectional matrix system or the Palodent 360 circumferential matrix band.

class 2 restoration adhesive example Prime&Bond Elect dental adhesive from Dentsply Sirona

Once your matrix is placed it’s time to apply adhesive. It’s understood in the dental community that the best and most durable bond is achieved through etched enamel.

The challenge with etching is that it affects enamel and dentin at different rates, which is why many dentists struggle with deciding between self-etching to avoid sensitivity or total-etching for a better bond to enamel. This is where the beauty of universal adhesives comes in – you can treat both the dentin and enamel appropriately by choosing when and where to etch, while only stocking a single adhesive in the office.

Because each case is different and etching can in some cases lead to greater sensitivity, we recommend using Prime&Bond active Universal Dental Adhesive. It provides you with the flexibility to make chairside decisions about etching technique to achieve a strong bond and minimize the likelihood of post-op sensitivity.

Avoiding Post-Op Sensitivity

Most dentists experienced in Class II restorations knows that postoperative sensitivity is a common problem, often caused by adhesive application technique mistakes. To minimize the chances of post-op sensitivity, avoid the following adhesive missteps:

  • Over-etching dentin – Dentin exposure to etchant should not exceed 15 seconds.
  • Over-drying dentin – Keep the dentin surface slightly moist prior to bonding.
  • Solvents not removed during drying step – Keep in mind that each type of solvent (acetone vs. alcohol) requires a different amount of air thinning to completely volatize.
  • Incomplete material coverage – Completely cover the entire internal surface of the cavity with the adhesive, ensuring it appears glossy rather than matte.
  • Under curing – Choose a light that performs well at clinically relevant distances. 

DS tunes: Dr. Alan Atlas on Class II restorations

Dr. Atlas is a Philadelphia dentist and Director of Restorative Microscopy at Technology Clinic at Penn Dental Medicine. In this DS tunes episode he talks about Class II restorations, the challenges associated with this procedure and different composite filling options.

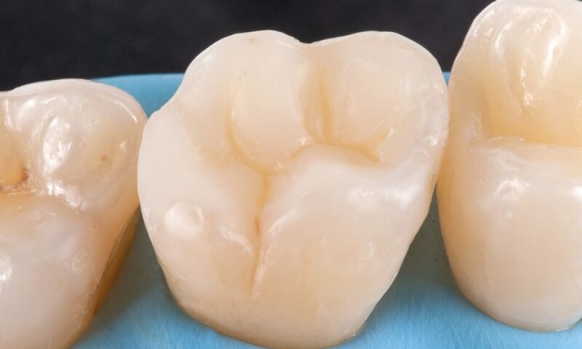
While light curing may seem like the simplest part of a Class II restoration, it’s not as straightforward as you might think. Traditionally, clinicians have been led to believe that as long as the blue light is near the restoration for long enough, the restorative material will cure.

It’s not as simple as that, which is why more than 37% of composite restorations are being insufficiently light cured7. The amount of energy delivered by the curing light is what leads to a successful procedure. The more energy delivered to the Class II restoration, the stronger the material will be. An insufficient cure can lead to adverse effects on physical properties, reduced bond strengths, breakdown at the margins, increased potential for microleakage, and ultimately secondary caries and Class II restoration failure.8

To be sure you’re curing effectively, make sure to consider the following when using your light:

  • Performance over distance: The #1 reason for Class II failure is recurrent caries, and the floor of the proximal box (often 8mm away from the tip of the light) is the most vulnerable interface. Be sure your curing light is effective over distance to avoid this.
  • Beam uniformity: Hot and cold spots within the light beam may lead to a non-uniform cure across the restoration, which is why you want a uniform beam profile.
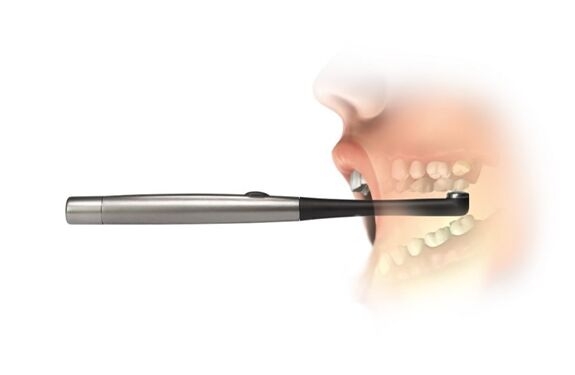
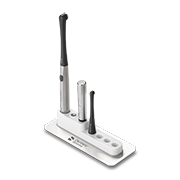
  • Angle: Be careful with the angle of your curing light. The guide tip should be as close as possible and parallel to the occlusal surface of a Class II to have the best chance at allowing light to fill up the proximal box. Pen-style lights make it easier to maintain the proper curing angle when space is an issue – such as the back of mouth, and in geriatric and pediatric cases.
  • Ergonomics and operation: A lightweight, ergonomic curing light design with simple controls may help reduce the opportunity for technique variability.
  • Curing Cycle length: While you can’t overcure the composite itself, you CAN, in fact, deliver too much radiant energy to the tooth, causing an excessive increase in temperature which can cause sensitivity, and damage the pulp and oral tissues. The safest and most reliable approach is to deliver a lower intensity over a longer exposure time.
Use of SmartLIte Pro for light curing

You should be using a light that fits all the above necessities, like the SmartLite Pro Modular LED Curing Light does. Not only does it have an ergonomic, slim pen-style design that makes intraoral access a breeze, it ensures reliable curing all the way to the floor of the proximal box, the most vulnerable interface in a Class II restoration.

With the tooth prepped, matrix placed, and adhesive applied and light cured, it’s now time to place the restorative material.  The main challenge faced in this step is cavity adaptation at the floor of the proximal box.  

SDR Flow Plus tooth application

Cavity adaptation: The consequences of poor cavity adaptation can be post-op sensitivity and recurrent decay. This can occur if the restorative material is unable to take on the shape of the cavity preparation or if there are unfilled areas. When choosing composite resins in a Class II, 90% of dentists report using a flowable as a liner to increase marginal adaptation9. Keep in mind that not all flowable resins are truly flowable, so be sure you’re choosing one that does in fact have the recommended viscosity for a Class II, like SDR flow + Bulk Fill Flowable. It self-levels without the need for manipulation, providing excellent cavity adaptation and gap free restorations.

CeramX Spectra ST tooth modelling

With the initial increment of material placed and cured, finish the restoration by choosing the composite resin material.  It’s crucial to consider esthetics at this stage, as 80% of patients are reportedly aware of color differences between restored and adjacent natural teeth.10

To simplify decision-making without sacrificing ease of composite placement, esthetics, or longevity, choose a composite like Ceram.x Spectra ST. It offers both a high and a low viscosity with comparable physical properties in each handling, and is available in 5 cloud shades that cover the entire 16-shade VITA® range.


Enhance tooth image after finishing

All that’s left now is finishing and polishing, which, when done properly, can potentially increase the longevity of the Class II restoration. You’ll want to have a smooth composite surface, as it’s more plaque and stain resistant.

You can accomplish this by using Enhance Finishers after gross contouring with a bur. Enhance Finishers achieve both intermediate and final finishing in a single step, and the result is a smooth, contoured surface in less steps.


More Efficient and Effective Class II Outcomes with Dentsply Sirona

Of course, not every Class II restoration will be similar and there are of course stipulations when it comes to success, but that’s where we come in. Dentsply Sirona’s Class II Total Practice Solution helps clinicians identify their unique Class II challenges and provides them tools and training to implement solutions for a better practice all around. To get started, contact us now!

Product Overview

Class II Solution

Palodent 360

Circumferential
Matrix System

Palodent V3

Sectional
Matrix System

Prime&Bond active

Universal
Dental Adhesive

SmartLite Pro

Modular
LED Curing Light

SDR flow+

Bulk Fill
Flowable

Ceram.x Spectra ST

Universal Composite Restorative

Enhance

Finishing
System


Downloads

Class II Solution Brochure

Class_II_Study_and_Case_Compilation

Read our Dentsply Sirona Class II study and case compilation to see how our solution performs.


You want to know more about the Dentsply Sirona Class II Solution?

Submit your contact details and we will get in touch with you.