The following materials can be processed in the CEREC SpeedFire. Below you can find detailed information about processing each material.
CEREC Tessera (Dentsply Sirona)
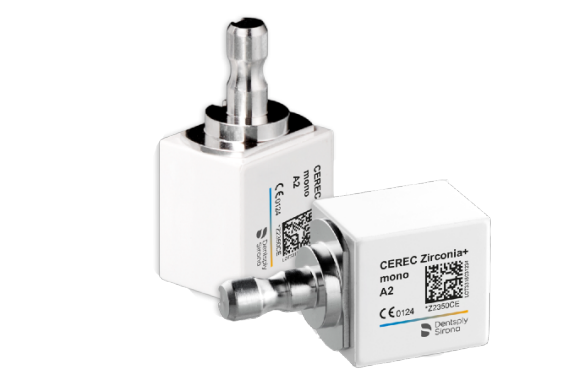
CEREC Zirconia+ and CEREC Zirconia meso (Dentsply Sirona)
CEREC MTL Zirconia (Dentsply Sirona)
Celtra Duo (Dentsply Sirona)
inCoris TZI and inCoris TZI C (Dentsply Sirona)
CEREC Blocs, CEREC Blocs C, CEREC Blocs PC, CEREC Blocs C PC (Dentsply Sirona)
VITA Mark II, VITA RealLife, VITA TriLuxe, VITA TriLuxe forte (VITA Zahnfabrik)
VITA SUPRINITY PC (VITA Zahnfabrik)
VITA YZ HT (VITA Zahnfabrik)
IPS e.max CAD (Ivoclar)
IPS e.max ZirCAD LT (Ivoclar)
Chairside Zirconia (3M Dental)
KATANA Zirconia (Kuraray Noritake Dental)
Initial LiSi Block (GC)
Prime Collection - Clinical Cases
Watch our collection of clinical cases. Experience how this smart technology can support you in your work to make the treatment experience for your patients better, safer and faster.
Below you will find detailed information for processing the different materials in the CEREC SpeedFire. Click on the bar with the respective material name to expand the information area. Under the keyword "Note", we have provided you with an overview of the scheme of information in advance.
Example
Milling/Grinding (Wet/Dry)
Possible processes in the CEREC SpeedFire
Firing support
Glaze
Fan
The tables for each material that you will find below give you important information on how to process the different blocks.
Milling/Grinding (Wet/Dry)
This column tells you whether you can dry mill, wet mill or wet grind the material with your CEREC milling and grinding unit prior to using your CEREC SpeedFire.
Selectable processes
This column indicates which processes can be selected for the respective material in the CEREC SpeedFire.
Cooling Fan
This column indicates whether the fan of the CEREC SpeedFire will automatically switch on for the respective material.
All other columns indicate which consumables you can use to process the material in the CEREC SpeedFire.
Step-by-step: Sintering CEREC MTL Zirconia and CEREC Zirconia+ in the CEREC SpeedFire
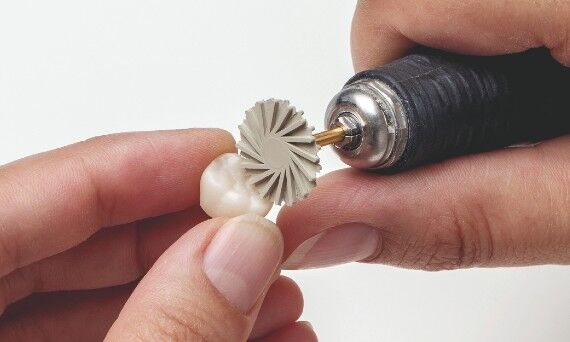
Step 1: Separate the restoration from the block and remove dust
A straight handpiece with a diamond wheel or a straight carbide bur can be used for this
Remove residual milling dust first with pressurized air, then with a large sable brush
Step 2: Place your restoration upside down inside the furnace chamber
In preparation for polishing and glazing, the restoration must first be sintered.
Step 3: Select and start the process "Sintering" on the display; after this process place the restoration on the fan to cool down
For wet milled restorations: Select process "Drying & Sintering" instead
Important: Wait until the clock timer has run down to 0
Danger: Avoid touching the restoration at this time as it is extremely hot!
Use tweezers to place the restoration for at least 2 minutes on the fan-area until cool to the touch
Step-by-step: Finishing CEREC Zirconia MTL and CEREC Zirconia+ - Polishing and optional Glazing in the CEREC SpeedFire
CEREC MTL Zirconia/CEREC Zirconia+ can be finished by polishing or through a combination of polishing and glazing.
Polishing:
Ensure the restoration is properly polished, including the occlusal surface, especially the areas that are in direct contact with the antagonist.
After functional adjusting, re-polish the surfaces to achieve a high gloss.
This ensures the potential of unwanted abrasion while delivering a final high quality restoration.
Optional Glazing:
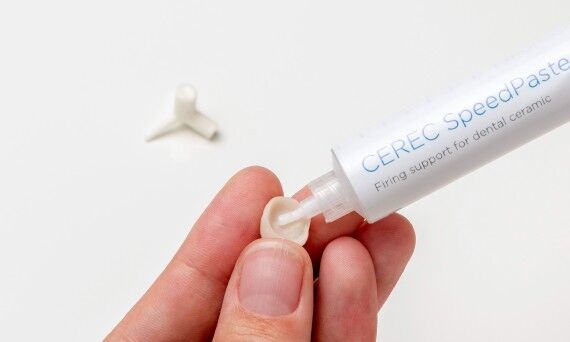
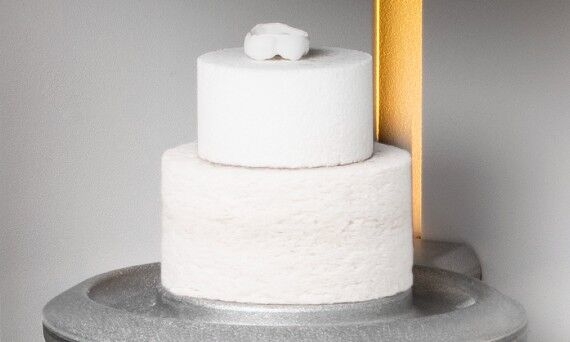
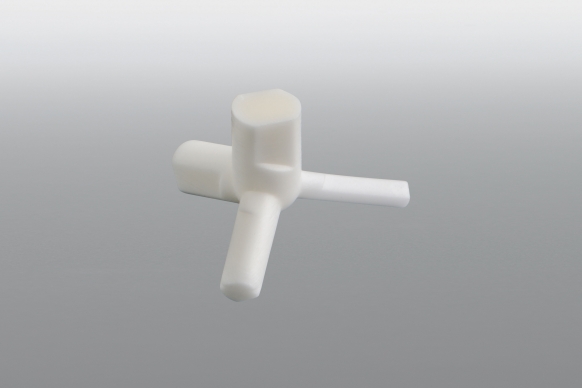
Step 1: Fill the restoration with CEREC SpeedPaste and put it on a glaze support pin
Fill the inside of the crown with just enough CEREC SpeedPaste to support the firing pin – do not overfill.
Push the crown gently onto a firing pin.
Single tooth restorations: Glaze support single unit
Bridges: Glaze support multi unit
Step 2a: Glaze your restoration with DS Universal Spray Glaze
Ensure that restoration is free of contamination and completely dried with oil-free air prior to glaze application.
Shake the container well immediately before usage
Keep the can as upright as possible during the spraying process.
Apply an even coat of spray from all sides and maintain a distance of 6 – 10 cm (2.5 – 4.0 in) between the nozzle outlet and the restoration surface.
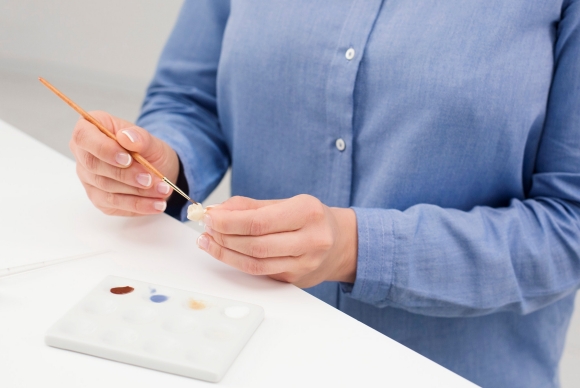
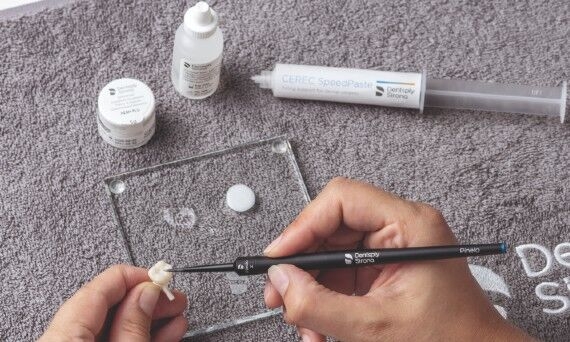
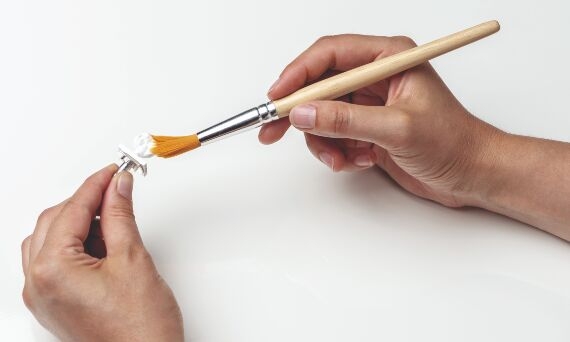
Step 2b: Glaze your restoration with DS Universal Stain & Glaze System
Ensure that restoration is free of contamination and completely dried with oil-free air prior to glaze application.
Apply a thin layer of the glaze material all over the crown surface by using a brush (e.g. Pinelo by Dentsply Sirona)
If a more intensive shade effect is desired, DS Universal Stains can be used
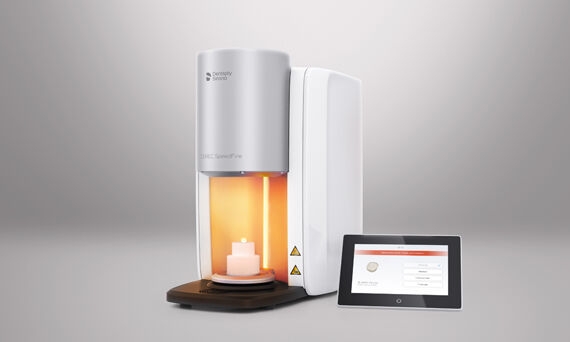
Step 3: Glazing in the CEREC SpeedFire furnace
Position the support with the restoration centrally on the top door insulation
Select the “GLAZE” program on the CEREC SpeedFire control panel and allow the unit to cycle
Important:Wait until the clock timer has run down to 0.
Danger:Avoid touching the restoration at this time as it is extremely hot!
Use tweezers to place the restoration for at least 2 minutes on the fan-area until cool to the touch.
Step-by-step: Cementation of CEREC MTL Zirconia and CEREC Zirconia+
Milling/Grinding (Wet/Dry)
Selectable processes in CEREC SpeedFire
Firing support
Glaze
Fan
Wet grinding
Glazing (up tp 3 glazing processes)
CEREC SpeedPaste
Dentsply Sirona Glaze support
CEREC SpeedGlaze
Celtra Universal Stain & Glaze
Off
Step-by-step: Glazing CEREC Blocs, CEREC Blocs C, CEREC Blocs PC and CEREC Blocs C PC in the CEREC SpeedFire
Step 1: Remove the sprue, polish, try-in/adjustments
Afterwards, be sure to clean your restoration thoroughly using soap and water, then blot dry with a clean, lint-free towel. Your restoration must be free of dust and debris before glaze is applied
Step 2: Fill your restoration with CEREC SpeedPaste and put it on a glaze support pin
Make sure to completely fill your restoration with CEREC SpeedPaste, in order to avoid the intrusion of impurities, which might negatively impact the fit.
Use the right glaze support pin for your indication:
Single tooth restorations: Glaze support single unit
Bridges: Glaze support multi unit
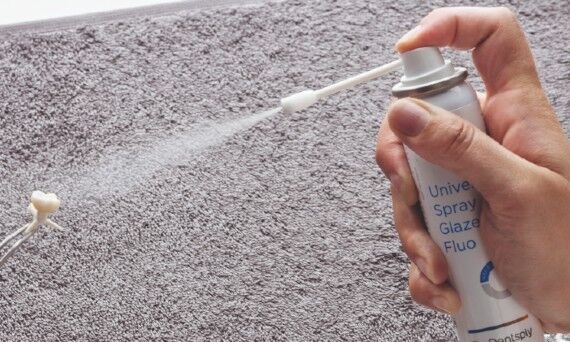
Step 3: Glaze your restoration with DS Universal Spray Glaze (Fluo) or stain it with DS Universal Stain and Glaze System
DS Universal Spray Glaze (Fluo):
Shake the container well immediately before usage.
Apply an even coat of spray from all sides and maintain a distance of 6 – 10 cm (2.5 – 4.0 in) between the nozzle outlet and the restoration surface.
Keep the can as upright as possible during the spraying process
DS Universal Stain and Glaze System:
Apply a thin layer of the glaze material all over the crown surface by using a brush (e.g. Pinelo by Dentsply Sirona).
If a more intensive shade effect is desired, DS Universal Stains can be used.
Step 4: Place the restoration in your CEREC SpeedFire furnace and start the process"Glazing" using the tablet; afterwards let your restoration cool down
The occlusal surfaces of the restoration point upwards
A maximum of 3 single-tooth restorations or a 3-unit bridge can be sintered in one go
Attention:Wait until the timer has expired to 0.
Important: Do not touch the restoration immediately, because it is extremely hot!
Please note: The fan is not available for this material
After cooling, check the glaze and add a second layer of glaze if necessary
Step-by-step: Sintering CEREC Zirconia, CEREC Zirconia meso, inCoris TZI and inCoris TZI in the CEREC SpeedFire
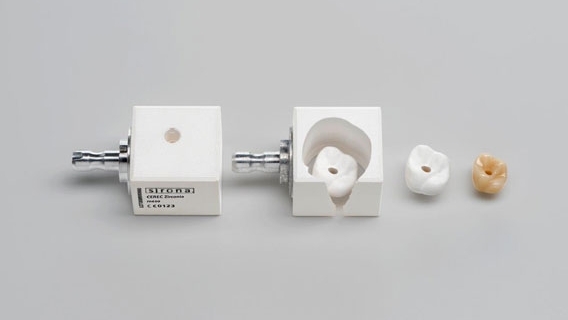
Step 1: Separate the restoration from the block and remove dust
A straight handpiece with a diamond wheel or a straight carbide bur can be used for this
Remove residual milling dust first with pressurized air, then with a large sable brush (only necessary for dry milled restorations)
Step 2: Place your restoration upside down inside the furnace chamber
Max. 3 single-tooth restorations or one 3-unit bridge can be sintered in one process
Step 3: Select and start the process "Sintering" on the display; afterwards let restoration cool down on the fan
For wet milled restorations: Select process "Drying & Sintering" instead
Important: Wait until the clock timer has run down to 0
Danger: Avoid touching the restoration at this time as it is extremely hot!
Use tweezers to place the restoration for at least 2 minutes on the fan-area until cool to the touch
Step 4: Try-in/adjustments
Control and adjust in the following order:
Internal fit, proximal contacts
Occlusal contacts
Dynamic contacts
Only use microfine diamonds (diamond grain size ≤40 µm) when making post-sintering adjustments
Clean the restoration (alcohol-based is recommended) and dry
Step 5: Surface finishing
General: following the sintering process the surface of zirconia restorations must always be finished.
Polishing: use normal polishing systems for zirconia such as Meisinger. Complete all required steps for the polishing system being used.
For glazing please see next steps.
Step-by-step: Glazing CEREC Zirconia and CEREC Zirconia meso in the CEREC SpeedFire
Step 1: Fill the restauration with CEREC SpeedPaste and put it on a glaze support pin
Make sure to completely fill your restoration with CEREC SpeedPaste, in order to avoid the intrusion of impurities, which might negatively impact the fit.
Use the right glaze support pin for your indication:
Single tooth restorations: Glaze support single unit
Bridges: Glaze support multi unit
Step 2: Glaze your restoration with DS Universal Spray Glaze (Fluo) or stain it with DS Universal Stain and Glaze System
DS Universal Spray Glaze (Fluo):
Shake the container well immediately before usage.
Apply an even coat of spray from all sides and maintain a distance of 6 – 10 cm (2.5 – 4.0 in) between the nozzle outlet and the restoration surface.
Keep the can as upright as possible during the spraying process
DS Universal Spray Glaze (Fluo):
Apply a thin layer of the glaze material all over the crown surface by using a brush (e.g. Pinelo by Dentsply Sirona).
If a more intensive shade effect is desired, DS Universal Stains can be used.
Step 3: Place your restoration on its support pin inside your CEREC SpeedFire furnace
Occlusal surface faces upward.
Max. 3 single-tooth restorations or a 3-unit bridge can be glazed at the same time.
Step 4: Start the process"Glazing" using the tablet; afterwards let your restoration cool down
For wet milled restorations: Select process "Drying & Sintering" instead.
Important: Wait until the clock timer has run down to 0.
Danger: Avoid touching the restoration at this time as it is extremely hot!
Use tweezers to place the restoration for at least 2 minutes on the fan-area until cool to the touch.
Check the glaze, add a second glazing if needed.
Milling/Grinding (Wet/Dry)
Selectable processes in CEREC SpeedFire
Firing support
Glaze
Fan
Wet grinding
Drying, Drying & Sintering, Sintering
-
-
On
Milling/Grinding (Wet/Dry)
Selectable processes in CEREC SpeedFire
Firing support
Glaze
Fan
Wet grinding
Glazing (up to 3 glazing processes)
Firing pad only
Firing pad and Honey comb
Investment Pin
DS Universal Stain & Glaze System
DS Universal Spray Glaze (with or without Fluo)
On
Step-by-step:Dry firing and glazing Celtra Duo in the CEREC SpeedFire
Step 1: Remove the sprue, polish, try-in/adjustments
Afterwards, be sure to clean the restoration thoroughly using soap and water, then blot dry with a clean, lint-free towel. Celtra Duo (ZLS) restorations must be free of dust and debris before glaze is applied and/or before firing.
Step 2 (Optional): Apply DS Universal Stain & Glaze Systom or DS Universal Spray Glaze (with or without Fluo) to add characterization to your restoration.
The Glazing Liquid helps thin out the glaze and stains for a smooth and even application with a fine tip brush.
Step 3: Place restoration in the CEREC SpeedFire either on a firing pad only, on a Firing pad and Honey comb or on an Investment pin. Note: Do not use any Putty or Paste. Now start the process "Glazing" using the tablet; afterwards let your restoration cool down
The occlusal surfaces of the restoration point upwards.
Be sure to trim the firing pad to fit the CEREC SpeedFire oven’s pedestal.
Important: Wait until the timer has expired to 0.
Attention: Do not touch the restoration immediately, because it is extremely hot!
Use tweezers to place the restoration for at least 2 minutes on the fan-area until cool to the touch.
After cooling, check the glaze and add a second layer of glaze if necessary.
For information regarding further materials, please directly contact our material partners.
CEREC SpeedFire Consumables
CEREC SpeedPaste
CEREC SpeedPaste is a ceramic firing paste and is used to fix restorations on the restoration holder for glaze firing e.g. CEREC Zirconia+ or CEREC MTL Zirconia (ATTENTION! Do not use for sintering!). The paste can be very easily removed after firing, e.g. using compressed air. Thanks to the very good consistency of the material, the restorations can be quickly and effortlessly fixed to the restoration holder.
Dentsply Sirona Universal Spray Glaze and Dentsply Sirona Universal Spray Glaze Fluo are an aerosol glazing porcelain used to glaze high-strength glass ceramic and zirconia dental restorations. The glaze spray is applied to restorations and fired.
The DS Universal Spray Glaze Fluo contains Fluorescence whereas the DS Universal Spray Glaze does not contain fluoresence.
The DS Universal Spray Glazes are compatible with:
High-strength glass ceramics such as CEREC Tessera, Celtra Duo, Celtra Press (also veneered with Celtra Ceram) and other glass ceramics.
Zirconia dental restorative materials such as CEREC MTL Zirconia, CEREC Zirconia+, CEREC Zirconia, Cercon ht (also veneered with Celtra Ceram) and other zirconia materials.
Dentsply Sirona glaze support pins
Together with the CEREC SpeedPaste, the Dentsply Sirona glaze support pins make it possible to hold your restoration using tweezers without the risk of damaging the applied glaze. Thanks to its three-legged design, your restoration is always stable and safe in the CEREC SpeedFire.
Single-tooth restorations: Glaze Support Single Unit (use the conical pin for abutments or abutment crowns)
Bridges: Glaze Support Multi Unit
The Dentsply Sirona glaze support pins can be used with:
Dentsply Sirona Universal stains and glazes are ideal for customizing and characterizing Dentsply Sirona materials. The staining and glazing colors are available in pasty form in 5 g jars and can be diluted with stane and glaze liquid if desired.
Dentsply Sirona Universal Stain & Glaze can be used with:
CEREC Tessera
Celtra Duo
CEREC Blocs, CEREC Blocs C, CEREC Blocs PC, CEREC Blocs C PC, CEREC Blocs C In
CEREC MTL Zirconia, CEREC Zirconia+
CEREC Zirconia, CEREC Zirconia meso, inCoris TZI
and many more materials.
You can purchase Dentsply Sirona Universal Stain and Glaze from your dealer.
Image database
In our database you will find approved images of the CEREC SpeedFire, which you can, for example, include on your website.
Previously, radio modules were the recommended connection for sending processing jobs from the CEREC AC to MC XL-family units. As the CEREC Primemill’s firmware updates are typically much larger than those for the MC XL units, completing these updates with a radio module takes considerably longer than with a WiFi solution. CEREC Primemill also offers additional features such as remote login which require a connection to the practice (or lab) network.
For those reasons, we recommend not to use radio modules with CEREC Primemill.
Please find all details in the document CEREC Network Operation Recommendations. This document covers all CEREC network-based components.
The factory-calibrated thermal element is constructed for the durability of the furnace. Therefore an exchange is not expected in the first years of operation.
The calibration tool is designed for the fine adjustment of the temperature measurement and is only necessary when the thermo-element in the field has to be changed.
It lasts at least 2000 cycles.
There is no risk. The device has been inspected and sufficiently shielded, so there is no risk of emission.
Connectivity and orders
Yes.
No, this is not possible.
No.
Yes.
We recommend a direct connection of the SpeedFire to your network via the Ethernet connection via LAN cable. In addition, the HW modules can also be used as a radio connection. If these options are not available, the SpeedFire can also be connected via Wi-Fi. For this you also need a USB-Wi-Fi adapter (REF: 6578012). In the case of a Wi-Fi connection, the ad-hoc mode is not permitted, the connection must be made via an access point.
No.
Yes, the furnace in general can be controlled by several Acs, yet for doing so the CEREC SW 4.4.1 or higher or the respective Premium version are required.
Yes, with Software inLab CAM 19.0 and higher it is now possible to control CEREC SpeedFire. All restorations fitting into the oven regarding their clinical dimensions may be transferred to CEREC SpeedFire by inLab CAM 19.0.
As soon as the order has been successfully forwarded to the furnace, the SW and the
CEREC AC can be switched off or a new case can be started.
Processing of the materials
CEREC SW 5.2.3 enables up to 3 CEREC Zirconia+ crowns to be sintered in a single process in CEREC SpeedFire.
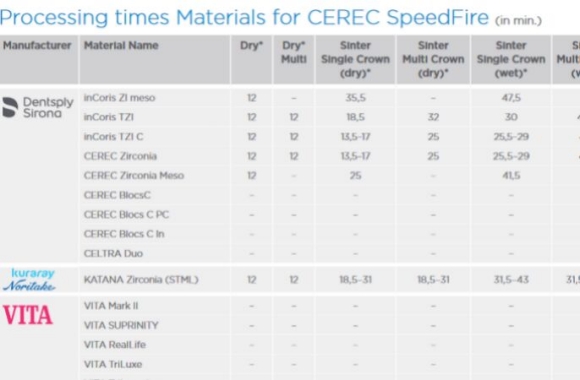
Yes, please open the detailed list of processing times below.
List of processing times materials CEREC SpeedFire
39 kB
No, only approved materials by Dentsply Sirona and our material partners can be processed.
CEREC SpeedFire enables sintering, crystallization and glazing of the Dentsply Sirona blocks CEREC MTL Zirconia, CEREC Zirconia+, CEREC Tessera and CEREC Zirconia as well as CEREC Zirconia meso, inCoris TZI and inCoris TZI C, inCoris ZI meso, CELTRA DUO and CEREC Bloc C and PC.
Furthermore, the furnace is authorised to process IPS.emax CAD (by Ivoclar), VITA SUPRINITY PC (by VITA Zahnfabrik) , Chairside Zirconia (by 3M Dental), KATANA Zirconia (by Kuraray Noritake Dental) or the Initial LiSi Block (by GC).
Yes.
Yes. A longer sintering process for lighter shades is not critical; this means sensitive colors will always be considered when combining colors during the heat treatment.
Yes.
The wall thickness is an important parameter for the calculation of the processing time during the heat treatment.
Studies
We recommend at least polishing the occlusal before glazing the restoration, this way the surface below the glaze is smooth just in case the glaze will be burst or grind away.
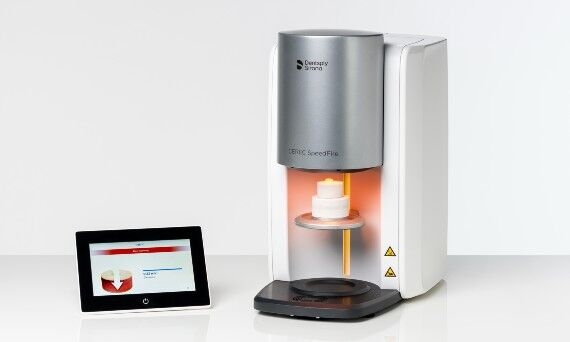
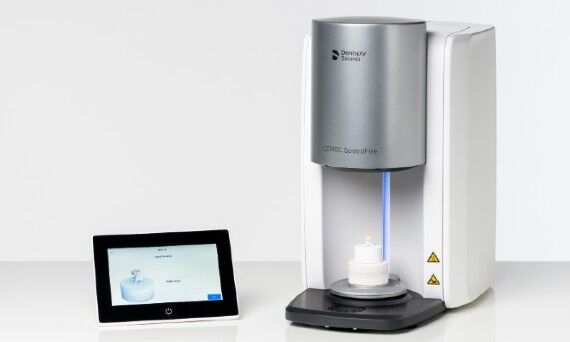
the smallest and fastest sintering furnace on the market (just 10–15 minutes typically required for sintering a full-contour zirconia crown).
a furnace that combines the sintering and glazing processes in one device.
completely automated: The CEREC software sends the order with all the necessary information to the furnace, eliminating the need for manual programming.
intuitive to use thanks to its touch display.
Did we spark your interest?
For more information on the CEREC SpeedFire, as well as the latest brochures and product videos, please visit dentsplysirona.com.